I have written a very simplified explanation of charging horsebox batteries for 12 volt and 24 volt horsebox battery systems. It is written with safety first in mind!
Some words of caution before you start to charge
1. Do not use a boost charger on your chassis as it could destroy expensive electronic components!
2. Batteries contain acid so use goggles and gloves when filling with distilled water. Batteries also store masses of electrical energy so take great care not to touch other terminals or chassis parts with spanners.
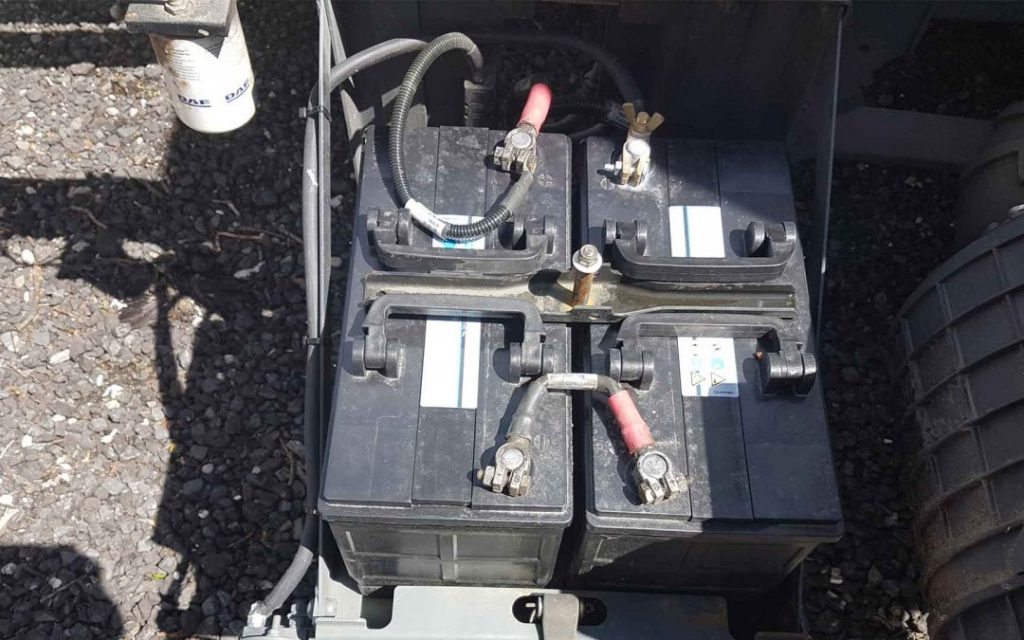
3. As you can see from the image above there are two batteries, each battery is 12 volt with 6 cells (added together in series this produces 24 volts). There are two lids on each battery allowing access to the cells for checking the electrolyte levels (some have individual screw tops). The electrolyte level in each cell must cover the plates before charging; only fill with distilled water and do not overfill.
4. I would always recommend disconnecting the batteries before charging them. Most horseboxes will have battery isolators, but these can be wired in any number of ways, so it’s always safest to turn the ignition off and disconnect the earth cable that joins the batteries to the chassis before charging. On the image above it is the top right hand side black cable attached to the terminal marked with a minus (-) symbol. Always isolate battery systems by removing the earth cable and never the red live cable!
5. Batteries are better charged slowly over a longer period than a high rate of charge for quickness. Overcharging can generate excessive heat which buckles the plates, over 50% of battery failures are caused by overcharging.
Before charging
How you charge the batteries will depend on your charger, historically most customers have owned 12 volt chargers, but I will detail both 12 volt and 24 volt charging below. Don’t forget to disconnect the batteries first and top up with distilled water before starting the charging procedure.
12 volt charging horsebox batteries
For 12 volt charging, each battery is charged separately.
With the charger turned off, connect the charger red cable to the terminal post with the positive (+) symbol and the charger black cable to the terminal post with the negative (-) symbol. Set the charger at a low power and turn on the charger. Keep an eye on the charge level and when fully charged turn off the charger and let it stand for ten minutes to dissipate any charging gas then repeat for any other batteries. When charged remove the charger and reconnect the earth lead then you’re good to go. This system of charging applies to vans and lorry chassis.
24 volt charging horsebox batteries
For 24 volt charging, both batteries are charged at the same time.
Modern chassis have 24 volt systems and the batteries are connected in series. To identify the correct terminals to use for 24 volt charging, with the charger turned off the black cable from the charger attaches to the terminal post with the negative (-) symbol at the top right hand side of the image (this is the terminal post where we removed the lead to isolate the batteries and the right hand battery on the image) at the other end of this battery (at the bottom of the image) there is a connecting cable joining the (+) terminal post on this battery to the (-) terminal post of the other battery. Follow this second battery (left hand side battery) back up to the top left hand terminal post marked (+) and the red cable from the charger attaches here.
Set the charger at a low power and turn on the charger. Keep an eye on the charge level and when fully charged turn off the charger and let it stand for ten minutes to dissipate any charging gas. Then remove the charger and reconnect the earth lead then your good to go.